The new Solana JavaScript client library (called gill), was recently released and is full of amazing benefits over the old web3.js library.
It's tree shakable, lightweight, and includes numerous quality of life improvements for devs anywhere in the JavaScript stack. You can use it to build Solana apps in Node, web, React Native, or just about any other JavaScript environment.
Learn Solana development with videos?
Hey! If video learning is your style, I have also published a complete video version of this article here on my YouTube channel: Solana JavaScript tutorial: Get started with web3js & gill
I have many more Solana development videos already published and several more planned. So be sure to subscribe to my YouTube channel (@nickfrosty) and keep an eye out :)
Gill is built on top of the modern javascript libraries for Solana built by Anza and used in
@solana/kit, formerly known as "web3.js v2". By utilizing the
same types and functions under the hood, gill is fully compatible with kit.
You can find the readme here in the open source repo. It contains a complete overview, full of snippets and examples. Plus a cute fish :)
PS: You can even find an entire video on how to get started with Solana JavaScript using gill on my YouTube channel. Or this playlist with lots of other Solana JavaScript tutorials.
Get started with Solana JavaScript and gill
In this article, I will detail all the basics of interacting with the Solana blockchain using
JavaScript and the gill library specifically. You can do many of these same things with kit, but
you will need to manually locate the other separate packages/clients for the same functionality gill
ships be default.
Gill provides a single entrypoint for JavaScript developers to just "build on Solana" without having to fuss with all the common things. Here is an overview of what gill can do and how easy it is:
- install gill
- create a connection to the Solana blockchain
- making Solana RPC calls in JavaScript
- loading Solana wallet/keypair from your filesystem
- creating Solana transactions
- how to create Solana instructions
- differences between partially signing and fully singing
- how to actually sign a Solana transaction
- getting a transaction signature
- easily logging a Solana Explorer link
- sending transactions to the Solana blockchain
And of course lots more resources for using the new Solana JavaScript package and sdk!
Installing the Solana JavaScript sdk
Like any good JavaScript library, you can install it with your package manager of choice:
npm install gillpnpm add gillyarn add gill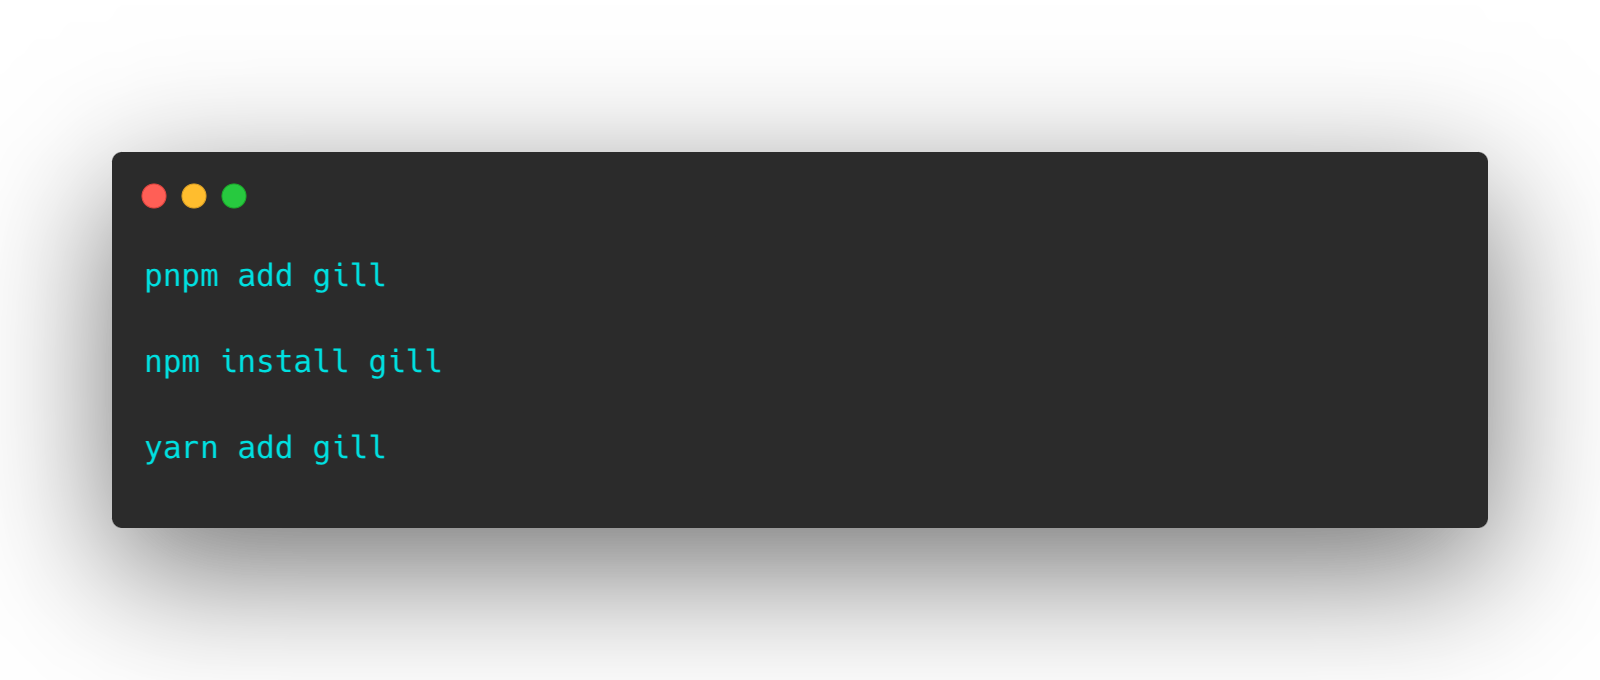
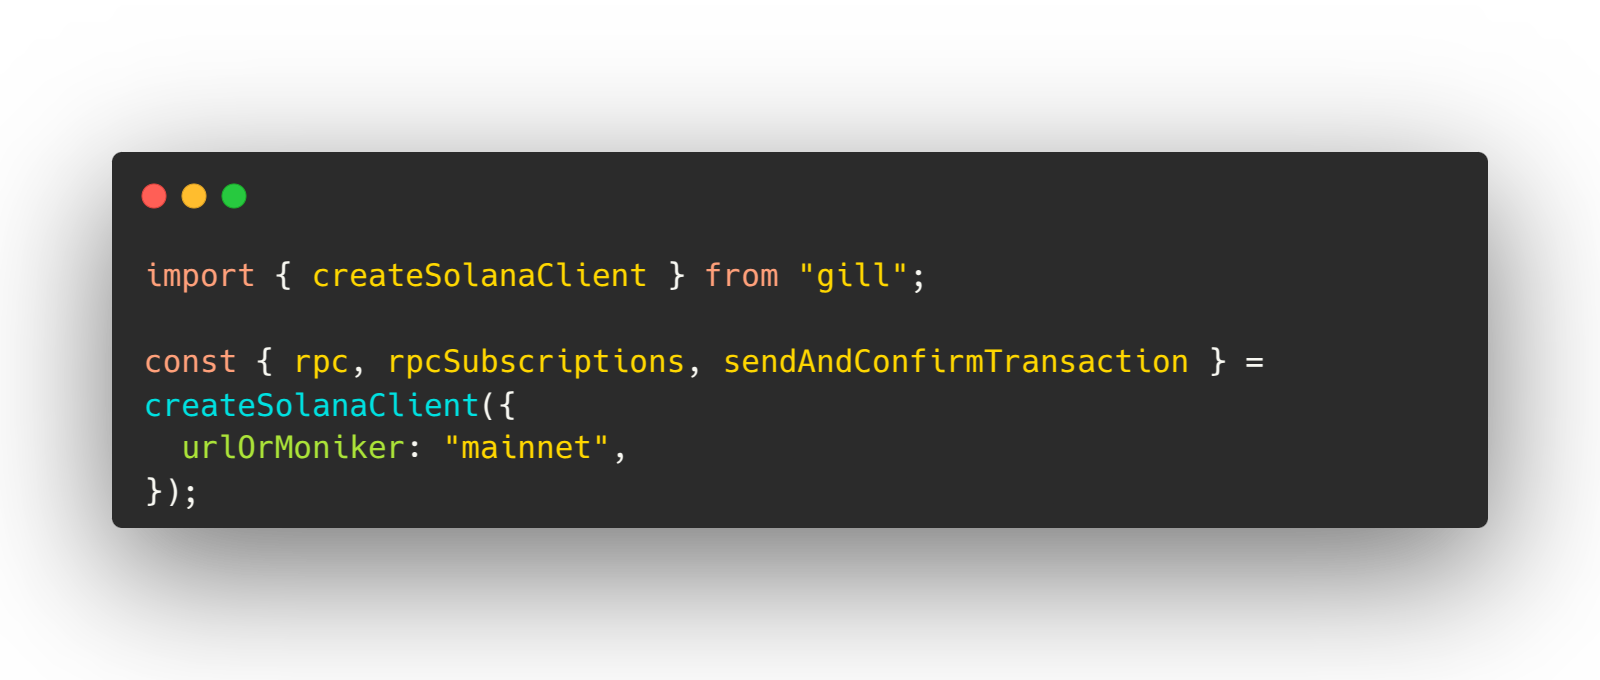
Create a connection to the Solana blockchain
Using the createSolanaClient() function, we can create the needed connections to the blockchain.
Allowing us to make RPC calls using our connection and RPC provider, either the public RPC endpoints
or your production ready provider.
With the urlOrMoniker value, you can pass in any of the common Solana network names (devnet,
mainnet, testnet, localnet) to utilize the public (rate limited) RPC endpoints. For
production applications, you should find a quality RPC provider service (or run your own) and
provide the full URL here instead.
import { createSolanaClient } from "gill";

const { rpc, rpcSubscriptions, sendAndConfirmTransaction } = createSolanaClient({
  urlOrMoniker: "mainnet",
});
The Solana client will provide a few key things to us:
rpc- connection object for the RPC endpoints over HTTPrpcSubscriptions- connection object for the RPC endpoints over websocketssendAndConfirmTransaction- function for signing and sending transactions- plus some others that we wont get into in this article
The rpc connection will become your best friend. This is how you will make nearly all of your RPC
calls, like getting latest blockhash or fetching accounts.
More on sendAndConfirmTransaction() in a bit.
Making Solana RPC calls in JavaScript
Once your have your rpc connection, you are ready to send request to the RPC server/provider. So
let's look at how to send some requests and get data from the Solana blockchain.
Like you might guess, the RPC method calls are async so you will need to await all those calls.
After all, its all using some HTTP transports under the hood (like the native fetch).
However, what you might not have guessed is the send() function. In order to actually send the
network requests, you must invoke the send() function as displayed in the snippet here:
import { createSolanaClient } from "gill";

const { rpc } = createSolanaClient({ urlOrMoniker: "devnet" });

// get the current slot
const slot = await rpc.getSlot().send();
This will call Solana JSON RPC method of getSlot.
How to get the latest blockhash
Likely the most common Solana RPC call you will make is to the getLatestBlockhash method.
On Solana, the latest blockhash is used to deduplicate transactions and effectively give a recent timestamp to transactions being send to the blockchain for validation and expiration.
Similar to the example above, you can get the latest blockhash with JavaScript as follows:
import { createSolanaClient } from "gill";

const { rpc } = createSolanaClient({ urlOrMoniker: "devnet" });

// get the latest blockhash
const { value: latestBlockhash } = await rpc.getLatestBlockhash().send();
Notice the latestBlockhash value is actually destructured from the response, renaming the
response's value field to latestBlockhash. This is a common practice in the
new Solana JavaScript libraries since it provides
cleaner and more readable code.
Get a Solana wallet from your computer
Before we get to creating Solana transactions, we need a wallet. Specifically a KeyPairSigner.
These special signers are aware of the ED25519 cryptography curve (aka the one Solana uses) and are
able to perform "singing operations" that the Solana blockchain can understand.
For the examples in this article, we are going to open a Solana wallet from the local filesystem. This is a very common process for scripting or backend servers that need to sign transactions, either partially or fully (more on signing below).
Within the gill library, you can use the loadKeypairSignerFromFile() function to import a keypair
json file (like the wallets created by the Solana CLI) into your
JavaScript code to perform signing operations with.
import { loadKeypairSignerFromFile } from "gill/node";

// default file path: ~/.config/solana/id.json
const signer = await loadKeypairSignerFromFile();
console.log("address:", signer.address);
By default, loadKeypairSignerFromFile will load the default Solana CLI keypair file from
~/.config/solana/id.json.
If you need to import a specific Solana wallet into your code, you can do that by providing the path to it:
import { loadKeypairSignerFromFile } from "gill/node";

const signer = await loadKeypairSignerFromFile("/path/to/your/keypair.json");
console.log("address:", signer.address);
Now we can use signer to sign transactions and messages!
Having a user wallet to sign a transaction
Even though this article focuses on loading a signer from the local filesystem, it's worth calling out how to add a user's wallet to a transaction since this is needed for frontend applications and dApps.
Once you know the user's wallet address (likely because they have connected their wallet to your frontend app), you can create a "noop signer" based on their address:
import { createNoopSigner, address } from "gill";

const userSigner = createNoopSigner(address("nicktrLHhYzLmoVbuZQzHUTicd2sfP571orwo9jfc8c"));
console.log("userSigner:", userSigner.address);
// output: nicktrLHhYzLmoVbuZQzHUTicd2sfP571orwo9jfc8c
These "noop signers" (short for "no operation" and spoken "no-op") allow your application to be fully type-safe even though your application does NOt have access to the user's secret key material (since it is securely stored in their wallet application of choice).
How to create a Solana transaction in JavaScript
Solana transactions are comprised of several important parts, all of which are required for the transaction to be successfully validated by the blockchain and stamped into the decentralized ledger:
version- Every transaction has a version. There are currently two versions:0andlegacy. Thelegacyversions support everything except for some newer features like Address Lookup Tables (ALTs). To keep it simple: for ALTs, use0. For everything else, uselegacy.feePayer- All blockchain transactions cost a fee. On Solana this fee is very very very small. But it's still there and someone has to pay it. Every transaction has a fee payer that signs the transaction. Therefore every transaction must have at least one signer.instructions- This is how our transaction tells the blockchain what we actually want it to do. What programs (smart contracts) the transaction will interact with. We must include at least one instruction for the transaction to success (aka a transaction must do something).latestBlockhash- We already talked about why we include the latest blockhash above :)
In gill, creating Solana transactions is incredible easy. Use the createTransaction() function.
Like this:
import { createTransaction } from "gill";

const signer = await loadKeypairSignerFromFile();
const { value: latestBlockhash } = await rpc.getLatestBlockhash().send();

const transaction = createTransaction({
  version: "legacy",
  feePayer: signer,
  latestBlockhash,
  instructions: [], // todo, see below
});
Now that we know how to build a basic transaction's structure, we need to make this transaction
actually do something. We need to provide a real value for instructions.
How to create a Solana instruction
On Solana, instructions are how you tell the blockchain to actually do something. Instructions declare what program to execute, what data to send to this program, and which Solana accounts are needed to execute the program successfully.
The simplest instruction that exists on Solana is the memo instruction. This does one thing: logs a
message onchain. Think console.log() but on the blockchain.
Gill includes an function called getAddMemoInstruction that will help you construct the
instruction with typed input:
import { getAddMemoInstruction } from "gill/programs";

const memoIx = getAddMemoInstruction({
  memo: "gm world!",
});
You can now include this instruction in your transaction inside the instructions array:
import { createTransaction } from "gill";
import { getAddMemoInstruction } from "gill/programs";

const signer = await loadKeypairSignerFromFile();
const { value: latestBlockhash } = await rpc.getLatestBlockhash().send();

const memoIx = getAddMemoInstruction({
  memo: "gm world!",
});

const transaction = createTransaction({
  version: "legacy",
  feePayer: signer,
  latestBlockhash,
  instructions: [memoIx], // now this does something!
});
Now we just created a complete transaction and need to sign it so we can send it to the blockchain!
Signing Solana transactions with a wallet
With your Solana transaction fully built and ready to go, it's time to actually sign it and send it to the blockchain for validation and inclusion in the decentralized ledger.
Gill supports a few patterns for signing Solana transactions:
- partially signing the transaction, and
- fully signing the transaction
Partially sign or fully sign?
You can explicitly sign the transaction with all available signers (aka the ones attached to the
instructions or the fee payer) using either the signTransactionMessageWithSigners() or
partiallySignTransactionMessageWithSigners() functions.
These do similar by notably different things:
partiallySignTransactionMessageWithSigners()will only sign the transaction with the attached signers. If a required signer is missing for some reason (like you built the transaction on your backend server and are going to send it to your frontend so the user can sign with their wallet app), then this is the function you want to use.signTransactionMessageWithSigners()will call the "partial sign" function, then assert the transaction is NOT missing ANY required signatures. If any signatures are missing, the function will throw an error.
Ultimately, the transaction is required to be FULLY signed before sending it to the blockchain for
validation. In fact, the sendAndConfirmTransaction() function (see below) will check if it's fully
signed or not. So which one of these signing functions you use will depend on your codebase and
expected user flow.
How to sign Solana transactions
With the above signing practices in mind, you can call the desired signing function to sign your transaction:
import {
  createTransaction,
  signTransactionMessageWithSigners,
  partiallySignTransactionMessageWithSigners
} from "gill";

const transaction = createTransaction(...);

const signedTransaction = await signTransactionMessageWithSigners(transaction);
const partiallySignedTransaction = await partiallySignTransactionMessageWithSigners(transaction);
How to get a transaction signature
After a transaction is signed by at least one signer, you can immediately get the transaction's
signature via getSignatureFromTransaction(). This is due to the fact that a Solana transaction's
signature (aka transaction id) is simply the first signature in the array of signatures a
transaction has.
You do NOT need to send the transaction to the blockchain in order to get the signature. Neat fact :)
How to log a Solana Explorer link for a transaction
After you have the transaction signature, you can use the getExplorerLink() function to easily log
the Solana Explorer link:
import {
  getExplorerLink,
  getSignatureFromTransaction
  signTransactionMessageWithSigners,
} from "gill";

const signedTransaction = await signTransactionMessageWithSigners(...);

const signature = getSignatureFromTransaction(signedTransaction);

console.log(getExplorerLink({
  transaction: signature,
  cluster: "devnet", // defaults to `mainnet`
}));
With getExplorerLink(), you can also provide the Solana cluster value to get the correct
explorer link for what ever Solana network you want. Including localnet for your running local
test validator.
No only does getExplorerLink() support transaction signatures, but you can also easily get the
explorer link for an account or block by providing those attributes instead.
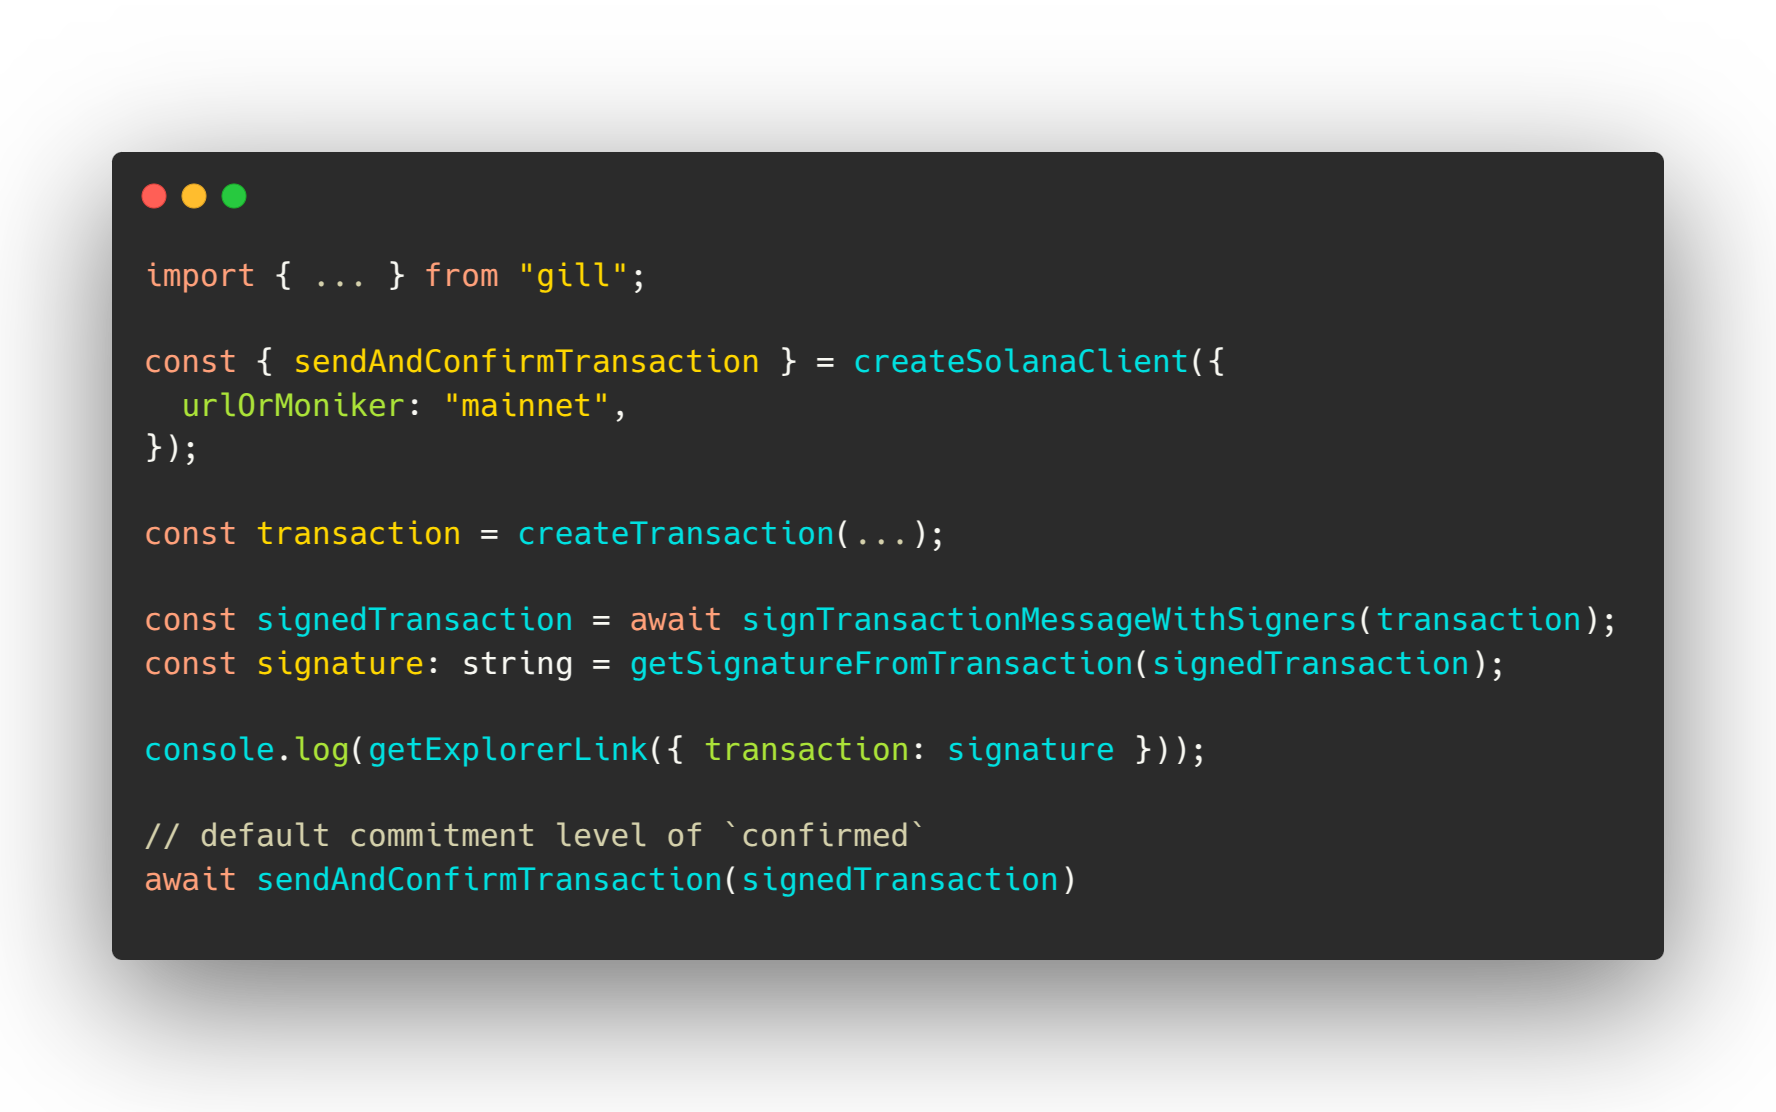
How to send a Solana transaction
Now that we have our signed transaction, we are ready to actually send it to the Solana blockchain.
When creating our Solana client connection using
createSolanaClient(), we are provided the sendAndConfirmTransaction() function to send
transactions directly to your RPC connection:
import { ... } from "gill";

const { rpc, sendAndConfirmTransaction } = createSolanaClient({
  urlOrMoniker: "devnet",
});

const { value: latestBlockhash } = await rpc.getLatestBlockhash().send();

const transaction = createTransaction(...);

const signedTransaction = await signTransactionMessageWithSigners(transaction);
const signature: string = getSignatureFromTransaction(signedTransaction);

console.log(getExplorerLink({ transaction: signature, cluster: "devnet" }));

// default commitment level of `confirmed`
await sendAndConfirmTransaction(signedTransaction)
In the condensed code snippet above, we are:
- getting the latest blockhash
- building the transaction
- fully signing the transaction
- logging a Solana Explorer link for us to view
- then actually sending the transaction to the blockchain and waiting for confirmation from the network that the transaction was included in the blockchain's ledger
Easiest way to send transactions to Solana
Since one of the goals of gill is to simplify and improve the developer experience of
Solana development, gill actually makes this even easier!
The sendAndConfirmTransaction() function can accept a signable transaction, allowing us to NOT
have to explicitly call signTransactionMessageWithSigners() or
partiallySignTransactionMessageWithSigners().
It will do it automatically for us so we can simply provide the signable transaction to
sendAndConfirmTransaction:
import { ... } from "gill";

const { rpc, sendAndConfirmTransaction } = createSolanaClient({
  urlOrMoniker: "devnet",
});

const { value: latestBlockhash } = await rpc.getLatestBlockhash().send();

const transaction = createTransaction(...);
await sendAndConfirmTransaction(transaction)
Under the hood, sendAndConfirmTransaction() will partially sign the transaction, via
partiallySignTransactionMessageWithSigners(), with all available signers attached to the
transaction's instructions. Allowing developers to simply their code even further :)
This function will only run the "partial sign" function under the hood to support both development flows: having access to all signer secret key material AND allowing user wallets to be included (view noop signers detailed above).
Afterwards, when the function attempts to serialize the transaction and actually send it to the blockchain: it will perform the final "is fully signed" checks to ensure only fully signed transactions will actually be sent to the Solana blockchain for confirmation.
Looking for more?
That's it! That is the comprehensive guide for the basics on
Solana development with JavaScript using the new sdk
called gill.
If you want to learn more about the new Solana JavaScript sdk, you can find more info here:
- Package on npm: https://npmjs.com/package/gill
- Open source repo: https://github.com/solana-foundation/gill
- Multiple examples for using gill: https://github.com/solana-foundation/gill/tree/master/examples
And these how to videos for Solana development:
- Solana JavaScript tutorial: Get started with web3js & gill
- How to create a token on Solana with metadata and JavaScript
- How to MINT tokens on Solana (JavaScript tutorial with gill)
PS: I have many more videos planned on Solana development, so be sure to subscribe to my YouTube channel (@nickfrosty) and keep an eye out :)